
Moringa Basics
Your “How To” Guide

PLANTING AND CARING FOR MORINGA 🌱
Planting Methods:
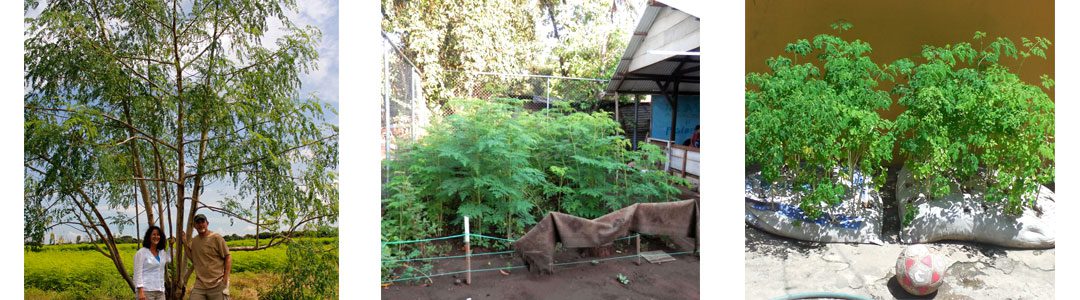
Moringa trees can be planted from seeds, cuttings, or nursery saplings. They can be grown as full-sized trees which will provide leaves, flowers, and seed pods (the fruit of the moringa tree) or as a bush, intensively planted in a small space (even in bags of dirt!) which will produce a large amount of leaves. Your preferred planting method will depend on your available space and how you plan to use moringa.
Once moringa is established, it is very hard to kill (it’s called the “never die” tree in West Africa), but it’s important to remember a couple of things:
- Moringa does not like to have water pooled around the trunk. This will rot the roots and kill the tree. When planting seeds, saplings, or cuttings be sure to plant on top of mounded soil.
- Moringa does not like soils that are too rich; it thrives in marginal soils and in drought conditions (once it has become established).
 From Seeds for Full-size Trees: The best time to plant moringa seeds is at the beginning of the rainy season. Ideal conditions include sandy loam soil, temperatures of 22c to 34c (72f to 93f), and rainfall of 700mm to 900mm (27 in. to 35 in.), but Moringa is very tolerant of imperfect conditions (including drought) and once established is relatively easy to maintain. For good seed production trees should be planted with 3 meter spacing (10 ft).
- Three to four weeks before planting dig holes 60cm (24 in.) round and 60cm (24 in.) deep, separate top half and bottom half of removed dirt into two piles.
- Mix topsoil pile with 1-2 shovelfuls of manure and put back in hole, then put remaining pile of dirt back into hole. It is best if dirt is somewhat mounded so that water cannot pool around trunk of tree. Moringa will die if it remains flooded for too long.
- The best time to plant is just prior to the start of the rainy season. This will ensure that the young trees will get enough water during their first growing season to become well-established. After that, they will not need as much water. Plant 2-3 seeds per hole 2cm to 3cm (.75 to 1.25 inches) deep. Germination will require 6 to 21 days.
- When saplings reach .5 meter (20 in.), remove weakest carefully so that roots of remaining tree are not damaged. Extra saplings can be transplanted to any empty holes. Keep area around saplings free of weeds.
 From Seeds for Intensive Planting: If the goal is to maximize leaf production, seeds should be planted close together – approximately 15cm (6 inches) apart. Plant them in double rows with enough space between the sets of rows to walk for easy of harvesting. The planting of the rows can be staggered so that each double row is ready to harvest at different times. When the trees reach about 1.5 meters (5 ft.) tall, prune them down to 15cm (6 inches) and eat the leaves either fresh, cooked, or dried. The pruned rows will grow back with even more branches and leaves. This method of planting provides a continuous source of leaves.
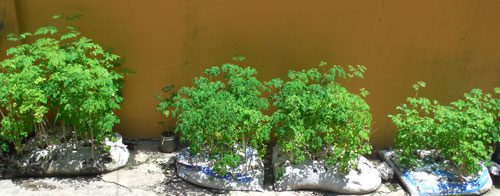
From Seeds in a Bag: If there is no ground for planting, or if the ground is too hard to work, moringa will grow well in woven bags filled with dirt. The bags can either be filled with dirt and stood on end or laid flat. If laid flat on hard ground, the roots will grow through the bag and into the ground below. If placed on concrete, it may be necessary to stack a few bags on top of each other to give the roots more space to grow. In flat bags, cut x’s in the bag and plant one seed in each the hole. When the plants are tall enough, prune them down to a few inches tall and eat the leaves. They will grow back and provide more even more leaves.
Moringa may also be used to create a living fence or planted randomly around the property as space allows.
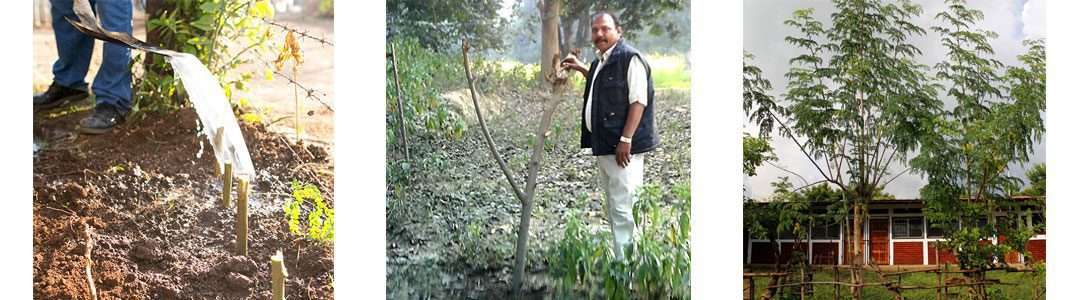
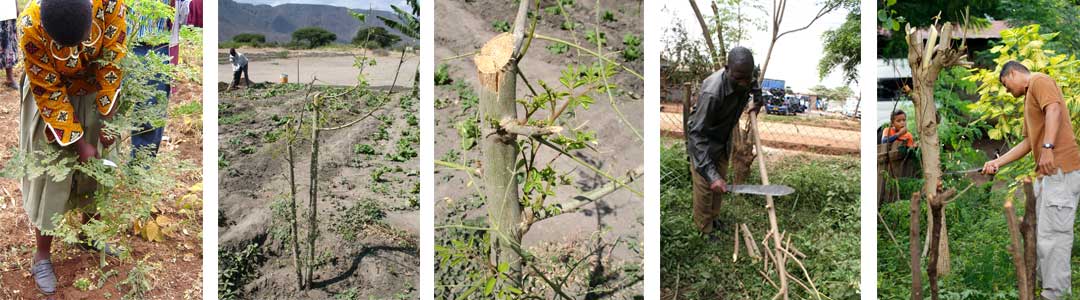
From Cuttings: If planting from seeds is not an option and cuttings are available, moringa will grow readily from cuttings. Plant cuttings by digging a hole, adding manure, and mounding the soil as described above. Cuttings can be of various sizes as seen below. The large cutting in the middle photo was planted by Iqbal in northeast India. He planted such a large cutting because the goats would eat anything smaller. He also put manure on the top of the cutting to protect it from termites. It sprouted within two months and grew into a full-sized tree with a large crop of seed pods within 14 months!
The photo on the right shows trees in Leon, Nicaragua, just 7 months after being planted from 2-foot long cuttings. Our Peer Educators in this location decided to plant from cuttings since the horses and pigs continually ate the saplings that were planted from seeds. They now have plenty of leaves to add to the school children’s lunches.
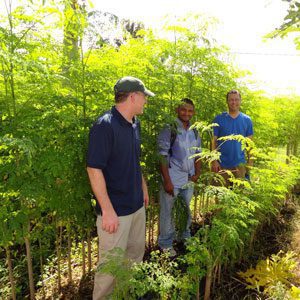
From Nursery Saplings: Moringa may also be grown from saplings; however, it’s been seen that the trees may not be as strong as those grown from seeds. When transplanting, use the same planting method as for seeds being careful not to disturb the roots. Some ideas for various sized nurseries are shown below. The photo on the right is of a nursery in Togo, which is built on an elevated platform made with branches and palm leaves. This protects the saplings from both animals and harsh sunlight.
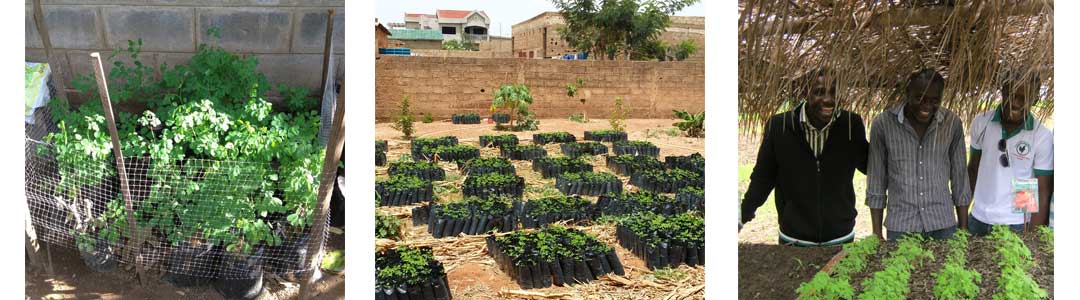
The photo below gives a better idea of how the platform nursery is built.
As you can see, moringa is very flexible and can be used in a variety of ways to meet a multitude of needs!
PRUNING AND HARVESTING 🍃
Pruning & Harvesting Your Full-sized Trees:
Once your tree is established, you can harvest leaves and small branches from it at any time. Any harvesting that you do will result in an increase in branching and leaf production. During the first year, pruning is especially important. Moringa grows very quickly and must be pruned aggressively in the first year to encourage lateral growth and increased production, as well as ease of harvesting. Below the photos you’ll find guidelines for pruning moringa, but in reality, since moringa thrives when it is aggressively pruned and it is not important where on the tree it is cut, just pruning it down to half its size three to four times in the first year and then pruning to keep the tree within easy reach thereafter will work well.
Photos left to right:
- The first pruning.
- This tree was pruned, and then . . .
- Just one week later, new growth is appearing.
- The tree in the background had been pruned once as you can see by the trunk, but the branches had never been pruned again and were about 15 feet tall. They were pruned back to the trunk and then cut into 2-foot lengths to be replanted as cuttings.
- Even a tree with a 6-inch trunk can be pruned to just a few feet tall and it will regrow within the next few months.
Pruning guidelines:
- When tree reaches a height of 1 meter (3.25 ft) cut to height of .5 meter (20 in.).
- When tree reaches a height of 1.5 meters (5 ft) cut to height of 1 meter (3.25 ft).
- When tree reaches a height of 2 meters (6.5 ft) cut to height of 1.5 meter (5 ft).
- When tree reaches a height of 2.5 (8 ft) meters cut to height of 2 meters (6.5 ft).
- Flowers will appear after 9 months, sometimes sooner depending on the climate.
- Seed pods will mature at around 12 months.
- When harvesting leaves or seed pods prune trees to a height of 2 meters (6.5 ft).
Below is one of our trees in Baja California Norte, Mexico. You can see that it was in desperate need of pruning in photo on the left. Our neighbor, Lupe, who takes care of it when we aren’t there, was quite concerned about pruning it so drastically. After we completed the pruning, he was worried and held onto the stump and said, “Mi bambino!” (My baby!) We returned after just 10 weeks to the lush, green tree on the right. It had grown nearly a foot per week and had put out three or more branches at each pruning point! Lupe was sold on aggressive pruning!

Harvesting Intensively Planted Moringa:
When moringa plants reach approximately 1.5-2 meters (5-6.5 ft) tall, prune to 15cm (6 in).
Depending on the amount of leaves needed, rows can be harvested at different times. Note that the row on the right has been recently harvested.
Plants will continue to grow back with more branches and leaves after each harvest.
This method of planting can be used in a small area and will provide a continuous supply of leaves.
EATING MORINGA 🍽️
Eating moringa is as easy as picking leaves from a tree!
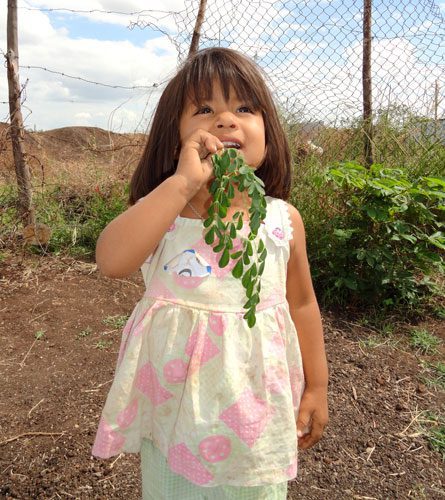
This is little Camila in Nicaragua. Her family had moringa growing right in their yard, but didn’t know what it was. Once we trained her mother and grandmother as Peer Educators, they were able to take advantage of the rich nutrition that was growing right at their doorstep.
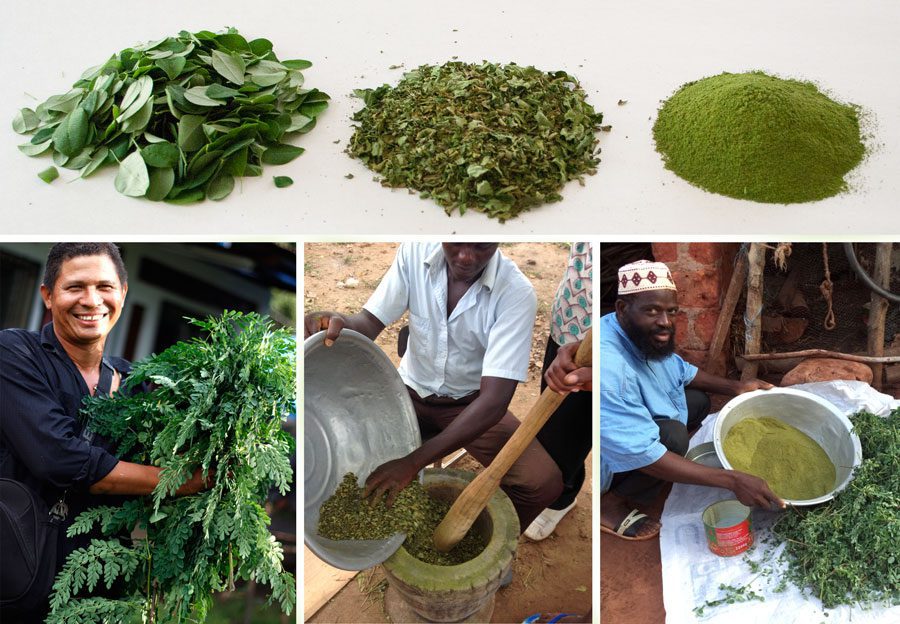
Moringa leaves can be eaten fresh, as a dried powder, or cooked. When eating fresh, be sure to pick the young leaves and wash them in clean water.
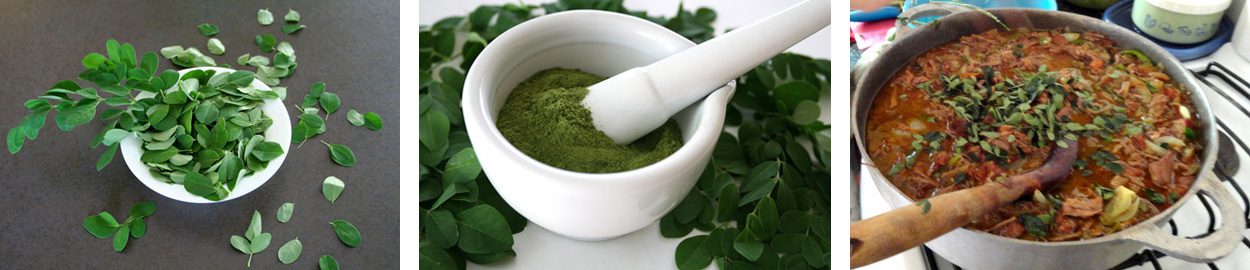
Moringa can be added to a variety of cooked dishes. It is best to cook moringa for as short a time as possible in order to retain the nutrients. Add moringa to the dish just a few minutes before it’s finished cooking.
It’s easy to make your own moringa powder!
- Harvest leaves by pruning branches from the trees.
- Wash the leaves to remove dirt and dust.
- Drying must be done in the shade, preferably indoors in a clean, well-ventilated space. If leaves are dried in the sun, the vitamin content will be reduced.
- Hang branches upside down or lay them on a mesh drying rack to insure good air flow (rack can be made of rope or metal). Turn or move branches as needed to prevent rotting or molding during the drying process. If flies or bugs are a problem in your area, you can create a mosquito net “room” by putting your drying racks under the net.
- After the leaves are completely dry remove them from the stems and crush the leaves into a powder, removing the small stems by shaking through a sieve, if available.
- Store powder in an airtight, opaque container out of the sunlight. If properly stored, the powder should retain it’s nutritional value for up to six months.
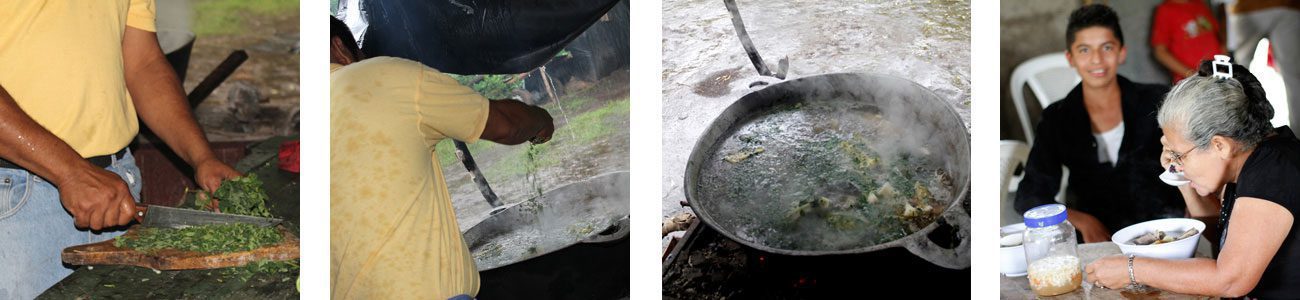
 Moringa recipes and serving suggestions!

Moringa Oil
Families can press their own nutritious oil from moringa seeds. Nutritionally, moringa oil is very similar to olive oil as it has a high levels of unsaturated fatty acids. For more information on the composition and value of moringa oil see our Resources page.
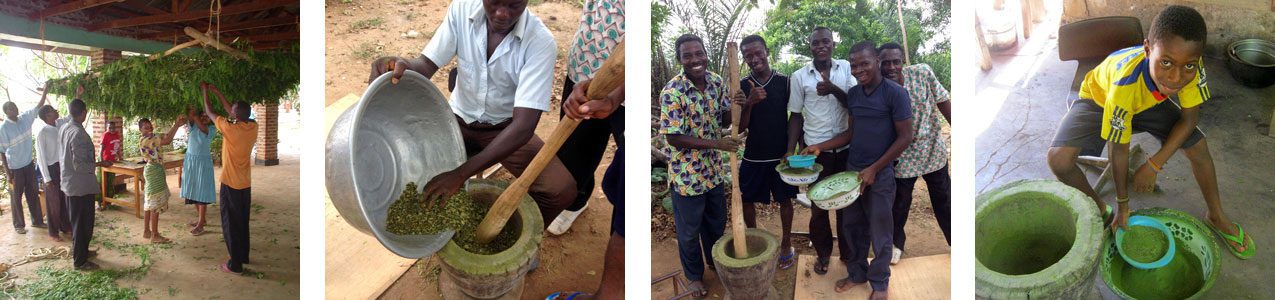
One of our Peer Educators, Olga, who lives in Togo, is seen below with her sons pressing moringa seed for oil using a Piteba oil press provided to their family by Strong Harvest. (Piteba oil presses can be purchased through Amazon.)

Tim Tanner, of Kilimo Timilifu (Holistic Farming), is a friend of Strong Harvest’s who lives in Tanzania. He has created an oil press that can be made from materials generally found in a village or small town. Here are instructions in how to build Tim’s oil press with insights on what he learned along the way.
You can see the first oil pressing by Rick, Strong Harvest’s founder, in our blog, Seeds to Oil in 4 Easy Steps!
Check out some of the scientific research

DRINKING WATER TREATMENT 💧
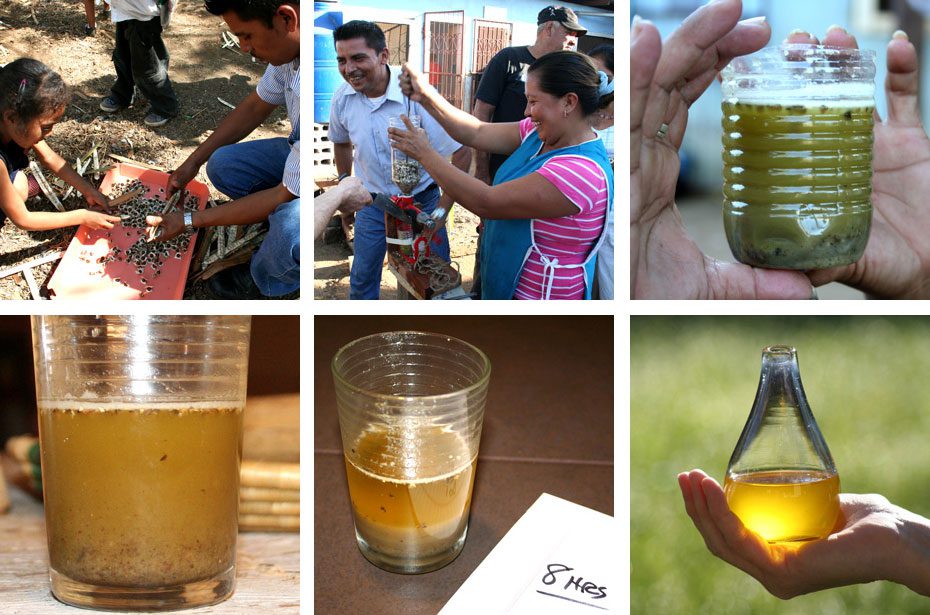
Moringa seeds can provide a family with clean water even in the most remote places.
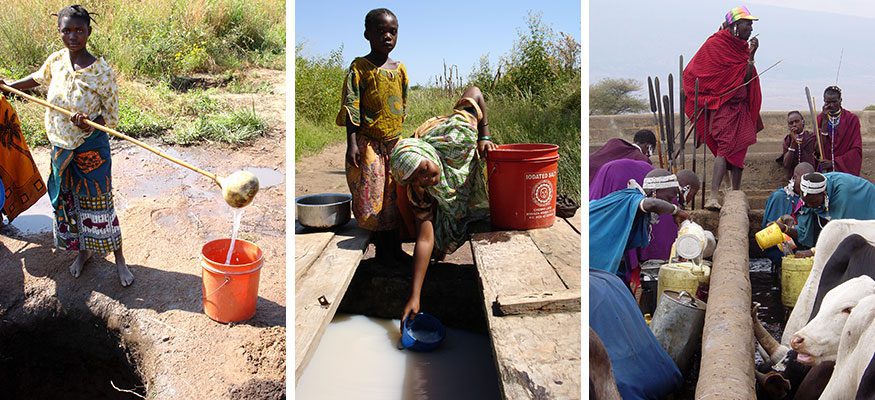
According to UNICEF, as of 2013, there were an estimated 1,800 children under the age of 5 dying every day of causes linked to water, sanitation, and hygiene.
Strong Harvest teaches families a simple process of combining crushed moringa seeds with water enabling them to have a sustainable supply of clean water, drastically reduce water-borne illnesses, and improve their health!
Water purification processes using crushed moringa seeds are continually improving. The most recent development uses a moringa-sand combination called functionalized sand (f-sand). Currently, point-of-use f-sand filters are being developed by various groups. In conversation with researcher, Stephanie Velegol, Ph.D., at Penn State University, we’ve learned that in laboratory experiments the f-sand process removes 99.99% of the contaminants from turbid water. (See “Water Purification” research.) In 2014, a research group from Miami University, succeeded in creating a point-of-use f-sand filter, building it for less than $20 out of locally sourced materials in the village of Chagurapamba, Ecuador. Strong Harvest plans to introduce this simple in-home technology to the families with whom we work in the near future.
Without a point-of-use filter, water can be treated in batches. This process will remove over 90% of the impurities from the water. While this is not perfect, it is a great improvement over the water that many families are forced to drink.
Process for cleaning water with moringa seed powder:
- This process works best on visibly dirty water.
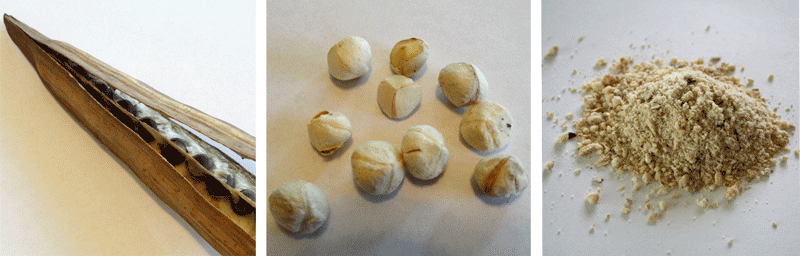
- Use seeds from mature, dried seed pods (the pods will be brown and beginning to crack open).
- Remove the outer shell of the seed to reach the white seed kernel.
- Crush the seed kernels into a powder. The basic formula is 1 seed cleans 1 liter of water; however, it can take more depending on how dirty the water is. It is important to experiment with your water source to determine the best amount of seeds to clean your particular water.
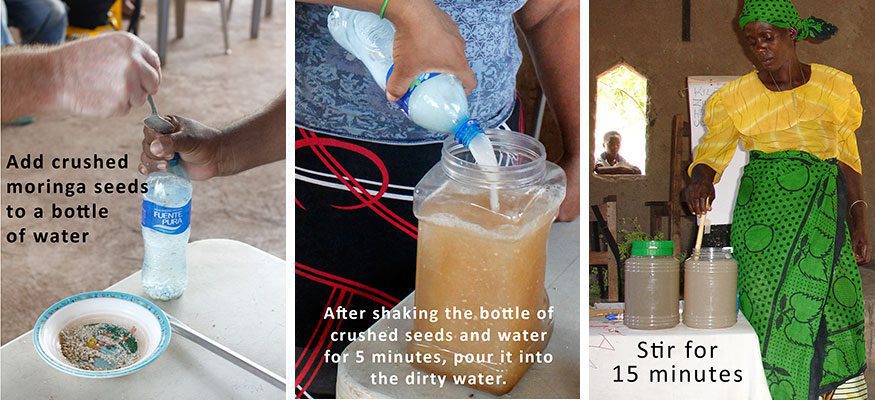
- Add seed powder to a half liter (2 cups) of clean water in a bottle and shake for 5 minutes.
- Pour this solution of powder and water into a 20 liter container of dirty water.
- Stir rapidly for 5 minutes, and then stir at a moderate rate for an additional 10-15 minutes.
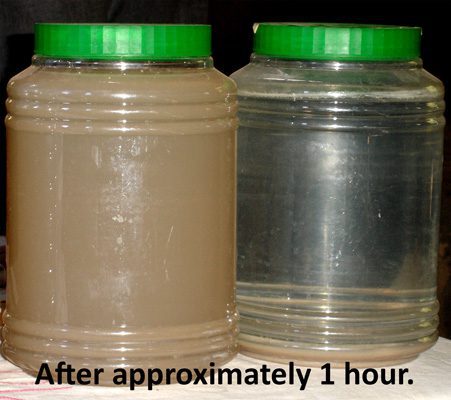
- Cover container and allow water to sit without being disturbed for 2-3 hours or longer until impurities have settled to the bottom.
- Being careful to not disturb sediments in bottom of container, slowly pour treated water through a clean cloth into a clean container.
- Use and storage of treated water
- Treated water should be kept in a clean, covered container.
- Treated water should be used within one day or bacteria may begin to grow. If the water is boiled after treatment, it will then be 100% safe.
The water is now ready to filter through a clean cloth and should be used within 24 hours. It cannot be stored for longer than 24 hours since it is not 100% pure and bacteria will begin to regrow.
Please note: The length of time it takes for the water to clarify will depend on the type of dirt suspended in the water. The water above was extremely dirty and it took only about an hour to clarify. However, this is the fastest we’ve ever seen it work. It can take from a few hours to overnight.

Having access to clean water changes everything!
Check out some of the scientific research

ECONOMIC OPPORTUNITIES 💲
Once moringa is seen as valuable in a community, a family’s trees will provide them with a vast array of opportunities to create income streams. Products include those that are easy to produce, requiring small amounts of labor and/or expertise. And then there are more advanced products which take an increased amount of labor and knowledge and may take equipment to produce.
Simple items that can be produced
- Fresh leaves
- Dried leaf powder
- Seeds
- Seed powder (for water purification)
- Saplings
- Animal feed (branches)
Advanced items that can be produced
- Oil (highly nutritious oil from seeds for cooking, light machine, cosmetics)
- Fertilizer – seed cake (remaining after pressing for oil)
- Animal feed – seed cake (remaining after pressing for oil)
- Leaf extract for crop spray (to enhance growth)
- Soap
- Paper
Above is oil pressing in action! After the oil has been pressed, let it settle, then filter it through a finely-woven cloth or a coffee filter. The result is a beautiful, healthy oil that is ready to use or sell.
To learn how to make an oil press your own oil press, see The Auger Bit Oil Press, by Tim Tanner who lives in Tanzania and works with families to create sustainable agriculture.
Other ideas from our Peer Educators:
In Leon, Nicaragua, Peer Educators started making a huge pot of soup with moringa in it every Sunday and sold it after church by the bowl. The benefits of their plan have been amazing:
- The men of the Luz y Vida Church have taken on this project as their own and used it as an opportunity to serve their community. Each Sunday a different gentleman brings his own soup recipe and cooks up a huge pot.
- After the Sunday service, the church members buy a bowl of soup and everyone gets to sit, eat, and socialize together.
- The proceeds from the soup sales have been used to finish building the walls of the church. See the story at The Walls that Soup Built!
In Babati, Tanzania, one of our Peer Educators shared that moringa oil is highly prized in the neighboring country of Uganda and that a friend of hers is pressing oil and selling it in Uganda at a very good price.
Markets for moringa are naturally occurring where the benefits of the tree are known. Our goal is to connect families and communities, not only to local and national markets, but also to international markets as pathways become available.
Send us your ideas for using moringa as an income producer – we’d love to share them!